The problem is the usual... having a draw call for each GUITexture that you put on screen. Of course there is SpriteManager to put all sprites into one mesh, and thus one draw call. Here is how I used it.
SpriteManager
Create a an empty GameObject and drag the SpriteManager script to it. Call the GameObject SpriteManager as well. Set the texture to point to your sprite sheet material and set the alloc block size to say 100. Also change it to CW from CCW.
Create a layer for the UI and make put the SpriteManager object in the UI layer.
Creating a Sprite Sheet
To create the sprite sheet I used Sprite Sheet Packer (only for Windows though), which given a set of images will generate for you the sprite sheet and also a text file containing the sprite sheet map which can be easily parsed. Each line of this text file will have imagename = x y width height.
I created the following sprite sheet map parser which returns a hashtable of the sprite's uv coordinates and dimensions indexed by the original image name
using UnityEngine;
using System.Collections;
using System;
using System.IO;

public class SpriteSheetMapParser : MonoBehaviour
{
public static Hashtable parse(string filename)
{
Hashtable h = new Hashtable();

try
{
// Create an instance of StreamReader to read from a file.
// The using statement also closes the StreamReader.
using (StreamReader sr = new StreamReader(Application.dataPath + filename))
{
 String line;
 // Read and display lines from the file until the end of
 // the file is reached.
 while ((line = sr.ReadLine()) != null)
 {
     int equalsIndex = line.IndexOf ('=');
//get the image name
     string name = line.Substring(0, equalsIndex).Trim();
//and the uv coordinates and width height
string[] dimensions = line.Substring(equalsIndex+1).Trim().Split(' ');
Rect r = new Rect(int.Parse(dimensions[0]),
    int.Parse(dimensions[1]),
    int.Parse(dimensions[2]),
    int.Parse(dimensions[3]));
//print(name+">>>"+r);
h[name] = r;
 }
}
}
catch (Exception e)
{
// Let the user know what went wrong.
print("The file could not be read:");
print(e.Message);
}
return h;
}
}
The next thing was creating a singleton base class to be used by any sprite sheets you are going to use, as you may be using multiple sprite sheets. So each sprite sheet you would want to access would be another class extending this base class.
using System.Collections;

public class SpriteSheetSingletonBase  {

private Hashtable spriteSheetMap;

protected SpriteSheetSingletonBase (string spriteSheetMapPath)
{
spriteSheetMap = SpriteSheetMapParser.parse(spriteSheetMapPath);
}

public Hashtable SpriteSheetMap
{
get
{
return spriteSheetMap;
}
}

}
For the sprite sheet used by the HUD I simply created this singleton
using UnityEngine;
using System.Collections;

public class SpriteSheetHUD : SpriteSheetSingletonBase{

private static SpriteSheetSingletonBase instance;

private SpriteSheetHUD () : base("/Textures/spritesheet.txt")
{

}

public static SpriteSheetSingletonBase Instance
{
get
{
   if (instance == null)
   {
       instance = new SpriteSheetHUD();
   }

   return instance;
}
}
}
I created the parser class with just one static method that extends MonoBehaviour due to print mainly. I didn't want he sprite sheet singletons to extend MonoBehaviour and have extra baggage. I wanted the singletons to be plain old objects.
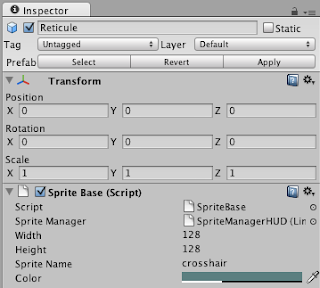
SpriteBase classNext was creating a sprite base class which would be linked with any transform (empty gameobject) that would require some sprite to be drawn at that position. You then just need to specify the name of the sprite in your sprite sheet map. You also need to link the sprite manager object in your editor with the script, as you may have multiple sprite managers as well. Of course you can create a script which extends the SpriteBase class to animate the object etc.

using UnityEngine;
using System.Collections;

public class SpriteBase : MonoBehaviour {

public SpriteManager spriteManager;
protected Sprite sprite;

public int width = 10;
public int height = 10;
public string spriteName;
public Color color = Color.white;
private Color oldColor = Color.white;

// Use this for initialization
void Start () {
Rect dimensions = (Rect)SpriteSheetHUD.Instance.SpriteSheetMap[spriteName];
sprite = spriteManager.AddSprite(gameObject, width, height,
 (int)dimensions.x, (int)(dimensions.y+dimensions.height),
 (int)dimensions.width, (int)dimensions.height,
 false);
sprite.SetColor(color);
}

// Update is called once per frame
void Update () {
if (color != oldColor)
{
sprite.SetColor(color);
oldColor = color;
}
// transform.position = transform.position + new Vector3(1,0,0);
// sm.Transform(s);
}

public void RemoveSprite() {
print("spritemanager should be removing sprite");
spriteManager.RemoveSprite(sprite);
sprite = null;
}

public void HideSprite() {
spriteManager.HideSprite(sprite);
}

public void ShowSprite() {
spriteManager.ShowSprite(sprite);
}
}
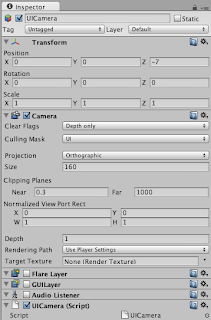
Setting up a UI CameraCreate a new camera, call it UI Camera. Set the culling to just the UI Layer, so first select nothing, and then select the UI.
From the main Camera you will have to remove the UI layer too, so go the main camera and from the culling just unselect the UI layer.
Set the depth the UI Camera to 1 so it is rendered after the main camera.
Also change it to orthographic. I also pushed it to some negative value, e.g. -7 in the z direction.
I changed the size to 160 on an iPhone display, so the size of sprites that I give when creating them, maps to the rendered size on the screen. That 160 is actually the screen height/2. If you are developing for iPad and Retina displays you would need to do something like this.
camera.orthographicSize = Screen.height/2;
I put that in the camera's script Update() although it should be in the Start() however in the editor the Screen.height wouldn't have been changed on starting up, if the window is set to iPad and Maximize on Play.

That should be it. Enjoy. Coming up next is how to do a radar.
